
Ever had one of those meals that just hits the spot every single time? For me, that’s this kielbasa and potatoes recipe. It’s the kind of dish that’s hearty, packed with flavor, and so easy to make that it practically cooks itself.
There’s something magical about the combination of crispy, caramelized kielbasa and buttery, golden potatoes. It’s smoky, savory, and a little indulgent—basically, comfort food at its best. And the best part? You only need one pan and about 30 minutes to make it happen.
I’ve made this dish countless times, tweaking little details to get the perfect balance of textures and flavors. Whether you’re meal-prepping, feeding a family, or just craving a quick but satisfying dinner, this is one recipe you’ll want to save. Let’s get into it!
Table of Contents
Why Kielbasa and Potatoes is the Ultimate One-Pan Meal
This dish has earned a permanent spot in my weekly rotation for a reason. Here’s why I love it (and why you will too!):
- Minimal Ingredients: Just a handful of pantry staples and fresh ingredients.
- Quick and Easy: Ready in under 30 minutes, perfect for busy weeknights.
- Bold, Smoky Flavor: The rich spices in kielbasa pair perfectly with crispy potatoes.
- One-Pan Cleanup: Because who wants a sink full of dishes?
- Customizable: You can add veggies, cheese, or switch up the seasonings to match your taste.
Plus, this dish somehow tastes even better the next day—if you manage to have leftovers!
My Journey to Finding the Best Kielbasa and Potatoes Recipe
The first time I made this dish, I figured I could just throw everything in a pan and let it do its thing. Spoiler alert: I was wrong.
The potatoes ended up mushy, the kielbasa was dry, and the whole thing lacked that crave-worthy texture I was going for. So, I started experimenting. I played around with different potato varieties, tested cooking methods, and discovered that the order of ingredients makes a world of difference.
The biggest game-changer? Cooking the kielbasa first. Letting it crisp up in the pan before adding the potatoes makes all the difference in flavor. And once I nailed the seasoning, it was game over—this became one of my favorite comfort meals.
Choosing the Right Kielbasa: Smoked, Fresh, or Turkey?
Not all kielbasa is the same, and the type you choose has a big impact on flavor and texture. Here’s a quick guide to help you decide:
- Smoked Kielbasa: This is my go-to! It’s fully cooked, packed with smoky flavor, and crisps up beautifully.
- Fresh Kielbasa: Needs to be boiled or grilled before using. It has a milder, juicy flavor but requires extra prep.
- Turkey Kielbasa: A lighter option with less fat but still delivers that smoky, savory bite.
If you want maximum flavor with minimal effort, smoked kielbasa is the way to go. But if you prefer a leaner alternative, turkey kielbasa is a great swap.
The Best Potatoes to Use for This Recipe (And Why They Matter)
Not all potatoes cook the same way, so choosing the right type makes a big difference in texture. After plenty of testing, here are my top choices:
- Yukon Gold: The best choice for a buttery texture and crispy edges. They hold their shape beautifully.
- Russet Potatoes: Get extra crispy when pan-fried, but the inside is a bit drier than Yukon Golds.
- Red Potatoes: Slightly waxy and firm, making them great for a more structured dish.
Personally, I’m all about Yukon Golds. They crisp up perfectly while staying rich and creamy inside. No matter which you choose, cutting them into even pieces ensures they cook at the same rate.
Now that we’ve covered the key ingredients, let’s dive into some expert tips that will take your kielbasa and potatoes to the next level!
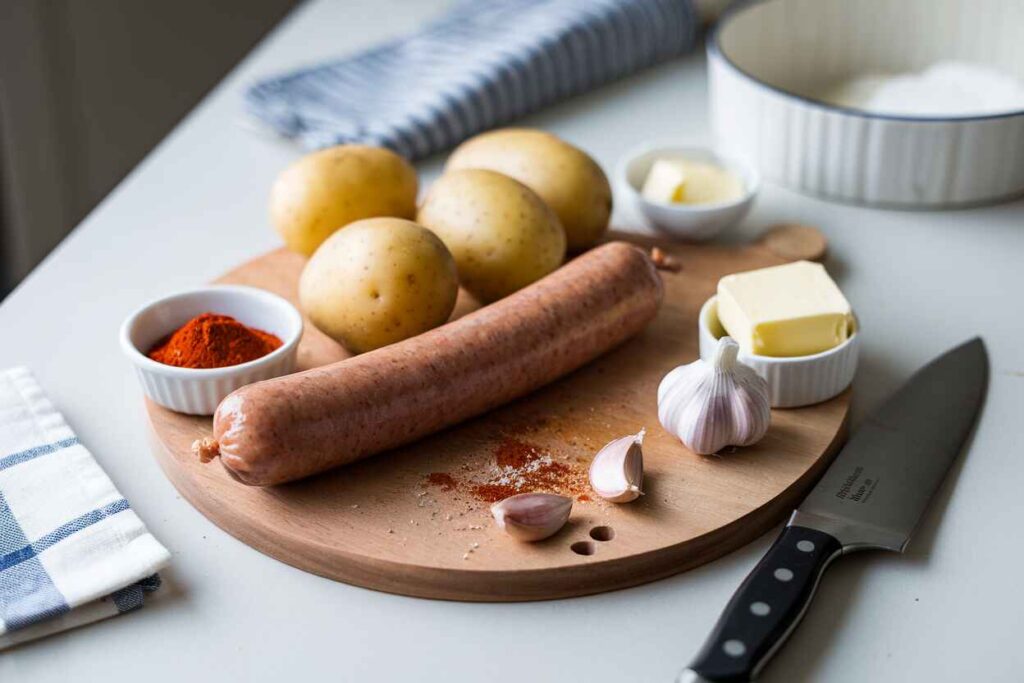
Essential Ingredients for a Flavor-Packed Kielbasa and Potatoes Dish
One of the reasons I love this dish is how simple the ingredient list is—yet when combined, they create something deeply flavorful and comforting. If you get these core ingredients right, you’re guaranteed a perfect plate of kielbasa and potatoes every time.
The Key Ingredients You Need
- Kielbasa: The star of the dish! I always go for smoked kielbasa for that rich, savory flavor. If you like a bit of heat, try a spicy or Cajun version.
- Potatoes: The base of the dish. Yukon Gold potatoes are my favorite because they crisp up beautifully while staying soft inside. Russet potatoes work well if you want extra crispy edges, while red potatoes hold their shape better but won’t get as crispy.
- Butter: A little butter goes a long way in adding richness and helping the potatoes brown perfectly.
- Garlic: Whether fresh or powdered, garlic enhances the savory flavors and adds depth.
- Smoked Paprika: I love adding this for a touch of smoky warmth—it complements the kielbasa beautifully.
- Onion Powder: This adds a subtle sweetness and enhances the caramelized flavors.
- Salt & Black Pepper: Simple, but essential! Adjust to taste, as kielbasa is naturally salty.
- Optional Add-Ins: If you want extra flavor, try adding sliced onions, bell peppers, or a pinch of red pepper flakes for heat.
Pro Tip: Balance Your Flavors
What makes this dish irresistible is the balance of smokiness, richness, and seasoning. The kielbasa brings the savory, smoky flavor, while the potatoes soak up all the goodness. Adding a little garlic and paprika brings warmth, and finishing with fresh herbs like parsley or thyme gives it a fresh, vibrant touch.
Once you’ve got the right ingredients, it’s all about technique. Let’s move on to how you can get that perfect crispy texture every time!
Expert Tip #1: How to Get a Perfect Crispy Brown on Kielbasa
Let’s be real—nobody wants soggy kielbasa. That golden, crispy edge is what makes this dish irresistible! I learned the hard way that simply tossing kielbasa into a pan isn’t enough. The trick? Letting it develop a deep, caramelized crust before moving on.
Here’s how to get that perfect crispy bite:
- Preheat the pan: Medium-high heat is the sweet spot. If the pan isn’t hot enough, the kielbasa won’t brown properly.
- No oil needed: Kielbasa releases its own fat as it cooks, so extra oil isn’t necessary.
- Don’t overcrowd: Spread the slices in a single layer so they brown evenly.
- Let it sit: Avoid stirring too often. Let one side crisp up before flipping.
Once it’s beautifully browned, remove it from the pan and set it aside. Trust me, this makes a world of difference!
Expert Tip #2: The Secret to Buttery, Tender Potatoes
Have you ever ended up with potatoes that are either too soft or too dry? I’ve been there. The secret is balancing moisture and crisping time.
Here’s what works:
- Use butter and drippings: After cooking the kielbasa, leave a bit of that rendered fat in the pan and add butter—it infuses the potatoes with flavor.
- Cover for the first few minutes: This traps steam, softening the potatoes before they crisp up.
- Finish with high heat: Once they’re fork-tender, crank up the heat to get those golden, crispy edges.
These small tweaks take the texture from meh to absolutely addictive.
Expert Tip #3: The Best Seasonings for Maximum Flavor
Kielbasa already packs a lot of smoky, garlicky goodness, so you don’t need heavy seasoning. But a few key spices make all the difference:
- Garlic Powder: Adds depth without burning like fresh garlic.
- Smoked Paprika: Enhances that smoky kielbasa flavor.
- Onion Powder: Complements the sausage’s natural sweetness.
- Black Pepper: Brings a little heat.
- Salt: Taste first—kielbasa is naturally salty, so you may not need extra.
If you love spice, a pinch of crushed red pepper flakes takes this dish up a notch!
Expert Tip #4: How to Make It a Complete Meal with Add-Ins
Want to make your kielbasa and potatoes even heartier? Try these delicious add-ins:
- Onions & Bell Peppers: They add sweetness and a pop of color.
- Cheese: A sprinkle of cheddar or Parmesan melts beautifully into the potatoes.
- Greens: Spinach or kale makes it a bit healthier without overpowering the dish.
- Eggs: Crack an egg on top for a hearty breakfast twist.
Now that you’ve got all the expert tips, let’s put them into action!
Step-by-Step Guide: How to Make Kielbasa and Potatoes Like a Pro
Follow these foolproof steps for a crispy, flavorful one-pan meal.
Ingredients
- 1 lb kielbasa, sliced into ¼-inch rounds
- 1.5 lbs potatoes, diced (Yukon Gold or Russet)
- 2 tbsp butter
- ½ tsp garlic powder
- ½ tsp smoked paprika
- ½ tsp onion powder
- ½ tsp black pepper
- Salt to taste
- Optional: Sliced onions, bell peppers, shredded cheese
Instructions
- Cook the kielbasa: Heat a large skillet over medium-high heat. Add the kielbasa in a single layer and cook for 3-4 minutes per side until browned. Remove and set aside.
- Sauté the potatoes: Lower heat to medium, add butter, and let it melt. Stir in the potatoes, season with garlic powder, smoked paprika, onion powder, and black pepper. Cover and cook for 10 minutes, stirring occasionally.
- Crisp the potatoes: Remove the cover, turn heat to medium-high, and cook another 5-7 minutes until golden brown.
- Combine everything: Add the kielbasa back to the pan and stir well. Cook for 2-3 more minutes.
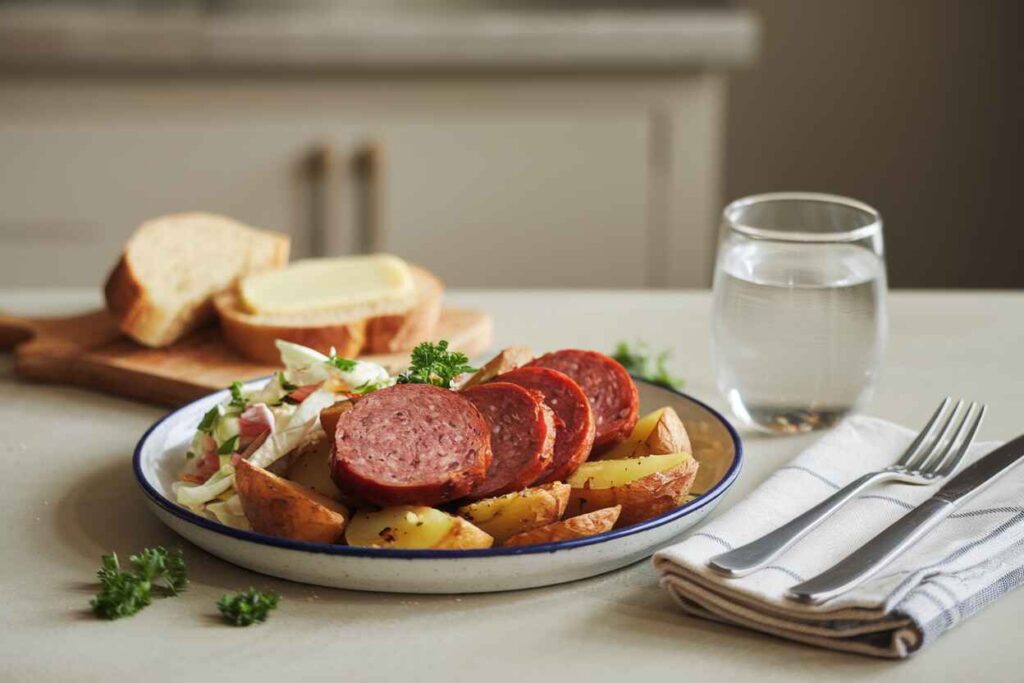
- Serve and enjoy: Adjust seasoning if needed. Garnish with fresh herbs or cheese!

And just like that—you’ve got a crispy, smoky, buttery plate of kielbasa and potatoes ready to devour!
Common Mistakes to Avoid When Cooking Kielbasa and Potatoes
Making kielbasa and potatoes sounds simple, right? Just throw everything in a pan and let it cook? Not so fast! There are a few common mistakes that can turn this dish from crispy and flavorful to mushy and bland. Trust me—I’ve made them all. But once I figured out what not to do, my results were perfect every time.
Here’s what you need to watch out for:
- Overcrowding the Pan: If you pile everything in at once, the ingredients will steam instead of brown. Give them space to crisp up properly!
- Skipping the Preheat: A cold pan means uneven cooking and no golden crust. Let your skillet get hot before adding anything.
- Using the Wrong Potatoes: Not all potatoes cook the same way! Russets get crispy but drier inside, while Yukon Golds stay buttery and tender.
- Not Letting the Kielbasa Crisp: Stirring too soon prevents those delicious, caramelized edges. Let the sausage sit undisturbed for a few minutes before flipping.
- Overcooking the Potatoes: Cooking them too long or at the wrong heat level turns them soft and greasy instead of crispy and golden.
Avoid these mistakes, and you’ll be well on your way to making restaurant-quality kielbasa and potatoes at home. Now, let’s talk about the perfect sides to pair with this dish!
The Best Side Dishes to Serve with Kielbasa and Potatoes
Wondering what to serve alongside your crispy kielbasa and potatoes? The beauty of this dish is that it’s so versatile—you can go for something fresh, something creamy, or something hearty to round out the meal.
Here are some of my favorite pairings:
- Sautéed Green Beans: A little garlic, a little butter, and you have the perfect fresh contrast to the richness of the kielbasa.
- Creamy Coleslaw: The tangy crunch balances out the smoky sausage beautifully.
- Roasted Brussels Sprouts: Their deep caramelization pairs so well with the crispy potatoes.
- Butter-Toasted Bread: Perfect for soaking up every last drop of those flavorful pan drippings.
- Simple Garden Salad: A light and refreshing option that keeps the meal balanced.
Can’t decide? Try mixing and matching! A crisp veggie and something creamy make the ultimate combo.
How to Store and Reheat Kielbasa and Potatoes Without Losing Flavor
Let’s be honest—leftovers rarely taste as good as the original meal. But with the right storage and reheating methods, you can get that same crispy, smoky, buttery perfection the next day.
How to Store Leftovers
- Refrigerator: Store in an airtight container for up to 4 days. The flavors deepen as they sit!
- Freezer: You can freeze it, but the potatoes may get slightly softer. If freezing, store in a freezer-safe container for up to 2 months.
The Best Way to Reheat Without Drying Out
- Skillet: The best method! Reheat over medium heat with a little butter or oil to bring back the crispy texture.
- Oven: Spread leftovers on a baking sheet and reheat at 375°F for about 10 minutes. This helps maintain crispiness.
- Microwave: This works in a pinch, but the potatoes can turn soft. Use short 30-second bursts and stir between rounds.
For the best results, I always go with the skillet method—it revives the flavors and keeps everything crispy!
Now that we’ve covered the best ways to serve and store your kielbasa and potatoes, let’s talk about how you can get creative with different variations and upgrades.
Kielbasa and Potatoes Variations: How to Switch It Up
One of the best things about kielbasa and potatoes? You can make it a little different every time! Whether you want to add more heat, make it extra creamy, or turn it into a full-on meal, there are endless ways to upgrade this dish.
Spicy Kielbasa and Potatoes
- Turn up the heat: Add sliced jalapeños or a pinch of red pepper flakes while cooking.
- Use spicy kielbasa: Try Cajun-style or hot kielbasa for a bolder flavor.
- Drizzle with hot sauce: A splash of sriracha, chipotle sauce, or buffalo sauce makes this next-level.
Cheesy Kielbasa and Potatoes
- Top with shredded cheese: Cheddar, Monterey Jack, or smoked Gouda work beautifully.
- Make it a casserole: Transfer to a baking dish, top with cheese, and bake at 375°F for 10 minutes.
- Stir in cream cheese: Want a creamy version? Melt in some cream cheese while the potatoes cook.
Garlic Butter Kielbasa and Potatoes
- Cook everything in garlic butter: A little butter and minced garlic take the flavor up a notch.
- Finish with fresh herbs: Chopped parsley or thyme brightens up the dish.
- Add a squeeze of lemon: A little acidity balances out the richness.
No matter how you tweak it, this dish is always a winner. Experiment with your favorite flavors and find your perfect version!
How to Use Leftover Kielbasa and Potatoes
If you’re lucky enough to have leftovers (I rarely do!), don’t just reheat them—transform them into something new! Here are a few creative ways to repurpose your dish:
Breakfast Hash
- Reheat in a skillet: A quick toss in a pan brings back the crispy texture.
- Top with a fried egg: That runny yolk acts like a sauce—pure magic.
- Mix in peppers & onions: Extra veggies add crunch and a little sweetness.
Kielbasa & Potato Soup
- Dice the leftovers: Cut everything into smaller pieces.
- Simmer in broth: Add chicken or vegetable broth and let it soak up the flavors.
- Finish with cream: A splash of heavy cream turns this into a rich, hearty soup.
Kielbasa and Potato Quesadillas
- Fill a tortilla: Layer the warmed kielbasa and potatoes with shredded cheese.
- Grill until crispy: Cook in a skillet until golden brown on both sides.
- Serve with sour cream: A little tangy dip takes this to the next level.
With just a little creativity, leftovers become an entirely new meal!
Bonus Recipe: Loaded Kielbasa and Potato Bake
If you love crispy, cheesy, oven-baked comfort food, this Loaded Kielbasa and Potato Bake is a must-try. It’s a heartier, slightly indulgent twist on the classic skillet version.
Ingredients
- 1 lb kielbasa, sliced into ¼-inch rounds
- 1.5 lbs Yukon Gold potatoes, diced
- 2 tbsp butter, melted
- 1 tsp garlic powder
- ½ tsp smoked paprika
- ½ tsp onion powder
- ½ tsp black pepper
- Salt to taste
- 1 cup shredded cheddar cheese
- ½ cup sour cream
- ¼ cup chopped green onions

Instructions
- Preheat oven: Set to 375°F.
- Prepare the potatoes: Toss diced potatoes with melted butter, garlic powder, paprika, onion powder, black pepper, and salt.
- Roast until tender: Spread on a baking sheet and bake for 20 minutes.
- Brown the kielbasa: While the potatoes bake, sear the kielbasa slices in a hot skillet until crispy.
- Combine and bake: Mix potatoes and kielbasa in a casserole dish. Sprinkle cheese on top and bake for another 10 minutes until melted.
- Garnish and serve: Remove from the oven, top with sour cream and green onions, and enjoy!
This version adds extra crunch, creaminess, and cheesy goodness—perfect for feeding a crowd!
Now that we’ve covered variations, leftovers, and a bonus recipe, let’s wrap things up with some final thoughts and FAQs.
Frequently Asked Questions About Kielbasa and Potatoes
What goes well with kielbasa sausage?
Kielbasa pairs well with a variety of flavors, from sweet and tangy to rich and savory. Some great options include sauerkraut, caramelized onions, roasted vegetables, creamy mashed potatoes, and grainy mustard. For a lighter touch, fresh salads or steamed greens balance out the smokiness.
What is kielbasa traditionally served with?
In Poland, kielbasa is often served with sauerkraut, pierogi, boiled potatoes, or rye bread. It’s also commonly enjoyed with mustard and horseradish for an extra flavor kick.
What is the best way to eat kielbasa?
That depends on how you like it! Kielbasa can be enjoyed grilled, pan-fried, baked, or simmered. It’s delicious on its own, sliced into pasta, stuffed in a sandwich, or mixed into dishes like casseroles and soups. If you love smoky, crispy flavors, pan-frying or grilling is the way to go.
What sides go with sausage and potatoes?
This dish is super versatile, so you can go for something fresh, creamy, or tangy to balance the richness. Some great side options include:
- Sautéed Greens: Spinach, kale, or Swiss chard add a nutritious touch.
- Coleslaw: A tangy, crunchy contrast to the hearty meal.
- Grilled Vegetables: Bell peppers, asparagus, or zucchini add a smoky touch.
- Buttered Corn on the Cob: A classic, slightly sweet pairing.
- Simple Salad: A light garden salad with vinaigrette cuts through the richness.
What type of kielbasa is best for this recipe?
For the best flavor, I recommend using smoked kielbasa. It has a rich, smoky taste that pairs perfectly with the crispy potatoes. You can also try turkey kielbasa for a lighter option or spicy kielbasa if you like a bit of heat.
Can I use a different type of sausage?
Absolutely! If you don’t have kielbasa on hand, you can swap it with andouille sausage for a spicier twist, bratwurst for a milder flavor, or chorizo for a bold, smoky kick.
What kind of potatoes work best?
Yukon Gold potatoes are my favorite for this recipe because they stay tender on the inside while crisping up beautifully. Russet potatoes also work well if you want extra crispy edges, while red potatoes hold their shape but won’t crisp as much.
Do I need to peel the potatoes?
It’s totally up to you! I like to leave the skins on for added texture and nutrients, but if you prefer a smoother bite, go ahead and peel them.
How do I get the potatoes crispy?
To ensure crispy potatoes, don’t overcrowd the pan, and cook them in a single layer. Also, make sure the pan is hot before adding the potatoes, and let them cook undisturbed for a few minutes before flipping.
Can I make this in the oven instead of a skillet?
Yes! To make this dish in the oven, spread the potatoes on a baking sheet and roast at 400°F for about 25 minutes, stirring halfway through. Then, add the kielbasa and bake for another 10 minutes until everything is crispy.
What can I add to make this meal even more flavorful?
If you want to enhance the flavor, try adding sautéed onions, bell peppers, or garlic. A sprinkle of smoked paprika or a drizzle of hot sauce can also bring a bolder kick.
How long do leftovers last?
Stored properly in an airtight container, leftovers will last up to 4 days in the fridge. If you need to keep them longer, they can be frozen for up to 2 months.
What’s the best way to reheat leftovers?
The best way to reheat kielbasa and potatoes is in a skillet over medium heat with a little butter or oil to restore the crispiness. You can also use the oven at 375°F for about 10 minutes. The microwave works, but the potatoes may turn soft.
If you’re loving the crispy, comforting flavors of this kielbasa and potatoes dish, why not explore more delicious and unique recipes? If you’re looking for a sweet treat with a protein boost, check out this guide to high-protein sweets. Need a crispy breakfast side? Learn how to make perfect hash brown patties in an air fryer. If you’re into gut-friendly baking, find out why sourdough muffins are a better option for digestion. And for a fun, customizable dessert, try your hand at making and customizing waffle cookies. There’s always something new to try in the kitchen!
Final Thoughts: Why Kielbasa and Potatoes is a Must-Try Dish
There’s a reason why this recipe is a household favorite—it’s simple, budget-friendly, and absolutely packed with flavor. With just a few ingredients and one pan, you get crispy, buttery potatoes and smoky, juicy kielbasa that taste like pure comfort.
What I love most is how versatile this dish is. You can enjoy it as a quick weeknight dinner, a hearty breakfast, or even a meal-prep favorite that reheats beautifully. And with all the variations, you can customize it to match whatever you’re craving.
So whether you’re making it for the first time or looking for a new twist, I hope this guide helps you create a meal that’s as delicious as it is easy. Now, grab your skillet, fire up the stove, and let’s get cooking!