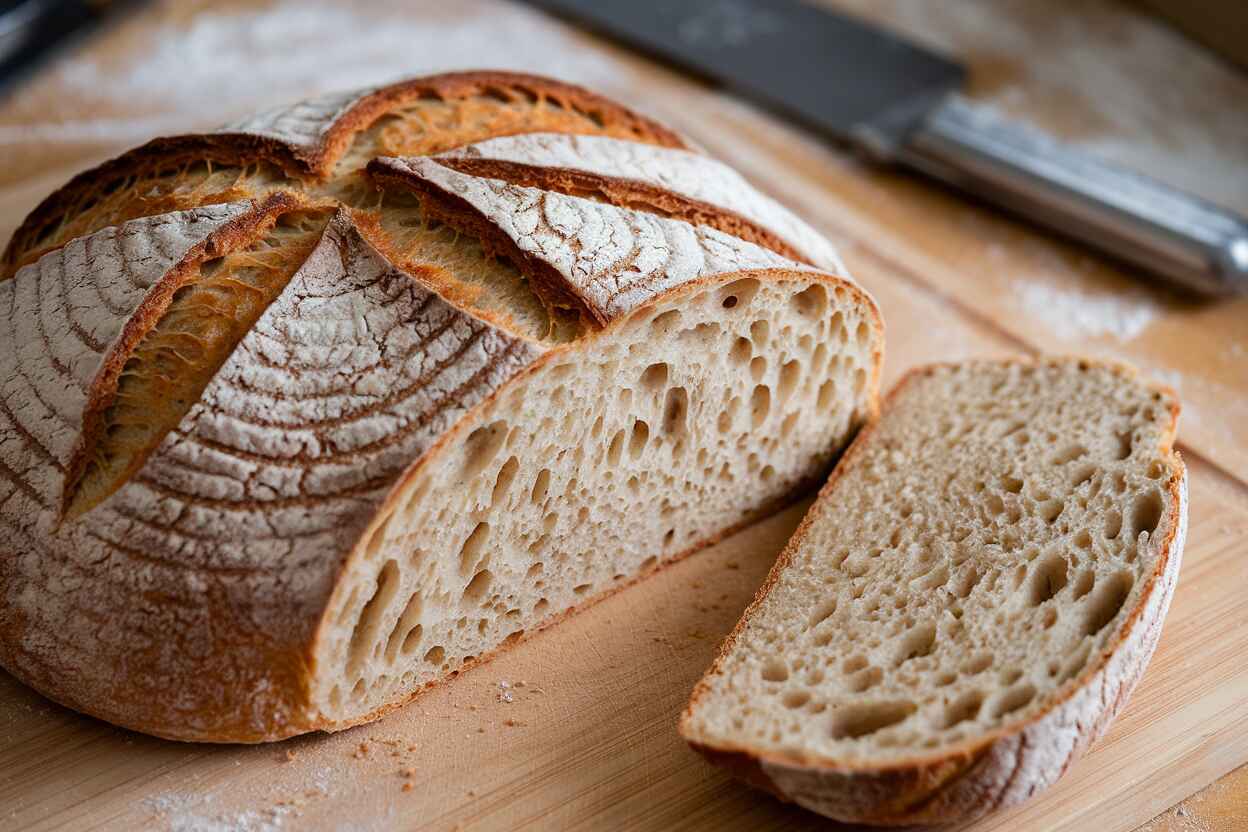
Let’s be real—baking gluten-free sourdough bread can feel like an impossible challenge. You follow the recipe exactly, wait patiently as your dough rises (or doesn’t), and then—boom—another brick-like loaf. Frustrating, right?
But here’s the thing—once you understand the secrets behind making gluten-free sourdough work, everything changes. You get a loaf with a golden, crispy crust, a light, airy crumb, and that deep, tangy sourdough flavor that makes it worth every bite. The best part? You don’t have to settle for mediocrity. With the right techniques—or what I like to call my 5 game-changing hacks—you’ll be baking sourdough that rivals any artisan bakery.
But here’s the good news—your gluten-free sourdough doesn’t have to be a disaster. After years of trial and error, I discovered five game-changing hacks that transformed my baking, and I promise—they’ll do the same for you. Let’s dive in!
Table of Contents
My Personal Struggles & Successes with Gluten-Free Sourdough
When I first started baking gluten-free sourdough bread, I failed—miserably. My loaves were flat, gummy, and lacked that signature sourdough chew. After testing dozens of recipes, tweaking ingredients, and rethinking the entire process, I finally cracked the code. Now, I’m here to share what I’ve learned so you can skip the frustration and go straight to baking the best gluten-free sourdough bread of your life.
Let’s get into the five game-changing hacks that will transform your gluten-free sourdough baking experience.
Understanding the Science Behind Gluten-Free Sourdough Fermentation
Fermentation is the heart of any sourdough bread, and while traditional sourdough relies on gluten to develop its structure, gluten-free sourdough requires a completely different approach. The key to success lies in the balance of wild yeasts, beneficial bacteria, and the right flour blend.
The Role of Wild Yeast and Lactic Acid Bacteria
- Wild Yeast: Naturally present in the environment, wild yeast is responsible for producing carbon dioxide, which helps the dough rise.
- Lactic Acid Bacteria: These bacteria feed on carbohydrates in the flour, producing lactic and acetic acids, which give sourdough its signature tangy flavor.
Why Fermentation is Even More Important in Gluten-Free Sourdough
- Breaks Down Starches: Fermentation makes gluten-free grains easier to digest by pre-digesting complex carbohydrates.
- Improves Texture: Long fermentation helps create a more structured crumb, preventing the loaf from becoming too dense.
- Enhances Flavor: The longer the fermentation, the more complex and rich the flavor profile becomes.
Pro Tip: Extending your bulk fermentation (6-8 hours) and using a mature gluten-free sourdough starter will yield better texture and a more flavorful loaf.
Hack #1: Choosing the Right Gluten-Free Flours for the Perfect Texture
Gluten-free baking is tricky because there’s no single flour that mimics wheat perfectly. That’s why the best gluten-free sourdough bread requires a blend of flours—each playing a unique role in creating structure, chewiness, and a beautiful crust.
Best Gluten-Free Flours for Sourdough
- Brown Rice Flour: Adds structure and mild flavor.
- Sorghum Flour: Provides a slightly sweet, nutty taste.
- Tapioca Starch: Improves chewiness and elasticity.
- Potato Starch: Helps retain moisture.
- Buckwheat Flour: Enhances depth of flavor and density.
- Psyllium Husk Powder: A game-changer for structure, mimicking gluten’s binding effect.
Pro Tip: Skip pre-made gluten-free flour blends for sourdough. Most contain gums and starches that don’t work well for fermentation.
Hack #2: How to Make a Strong Gluten-Free Sourdough Starter
Without a strong, active starter, your gluten-free sourdough bread won’t rise properly. Unlike traditional wheat starters that rely on gluten’s elasticity, gluten-free starters need extra care to develop enough strength for fermentation.
Step-by-Step Guide to a Reliable Gluten-Free Sourdough Starter
- Day 1: In a clean glass jar, mix ½ cup brown rice flour with ¼ cup filtered water. Stir until smooth and cover loosely with a breathable cloth.
- Day 2-4: Stir the mixture once a day and discard half before feeding it with equal parts flour and water.
- Day 5-7: By now, you should see bubbles and smell a mild tangy aroma. Your starter is ready when it doubles in size within 4-6 hours of feeding.
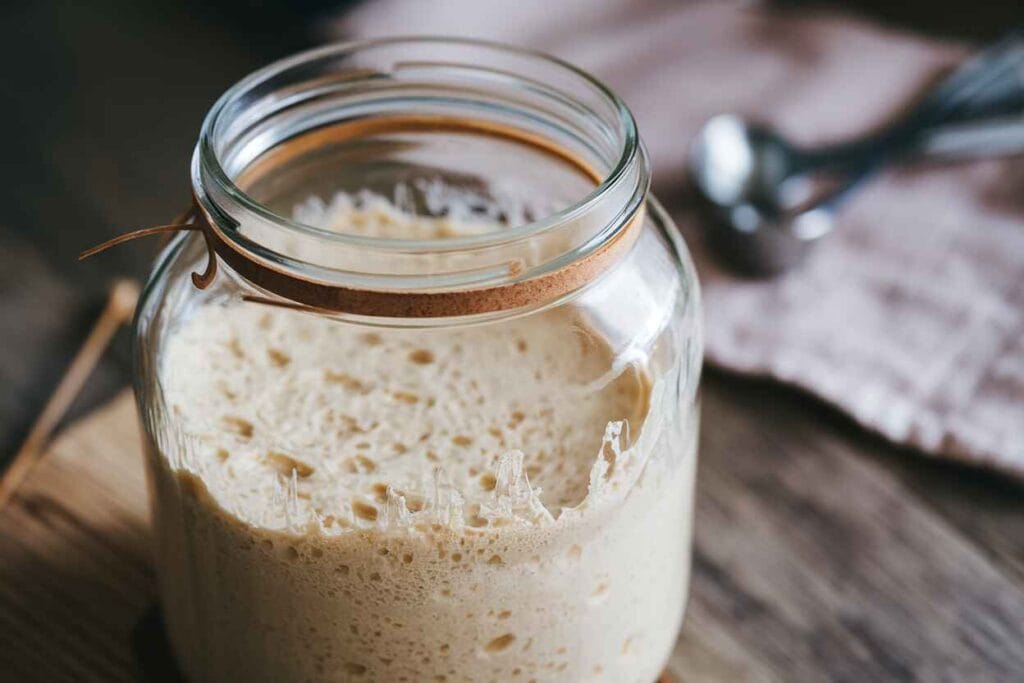
Pro Tip: Always use filtered or dechlorinated water. Tap water contains chlorine, which can weaken natural yeast growth and slow fermentation.
Hack #3: The Secret Hydration Trick for a Better Crumb & Rise
Hydration is the key to getting a soft, open crumb in gluten-free sourdough bread. Since there’s no gluten to hold moisture, using the right amount of water makes all the difference between a dry, dense loaf and one with a light, airy texture.
How to Adjust Hydration Levels
- For a lighter, airy loaf: Use 90-100% hydration (90-100g water per 100g flour).
- For a denser but structured loaf: Stick to 75-85% hydration.
Pro Tip: Your dough should feel sticky and more like a thick batter. If it looks dry, add a little more water instead of flour.
Hack #4: The Best Fermentation & Proofing Methods for Gluten-Free Dough
Fermentation and proofing don’t just develop flavor—they also help create the structure that gluten-free sourdough bread needs to rise properly. The trick is giving the dough enough time to ferment without over-proofing.
How to Optimize Fermentation
- Bulk Fermentation: Let the dough sit in a warm spot (75-80°F) for 6-8 hours or overnight.
- Cold Proofing: After shaping, refrigerate the dough for 12-24 hours to develop deeper flavor.
- Final Proofing: Bring the dough back to room temperature before baking for 2-4 hours.
Pro Tip: If your loaf isn’t rising enough, proof it in a slightly warmer environment, like inside an oven with just the light on.
Hack #5: How to Bake Gluten-Free Sourdough for the Crispiest Crust
The biggest challenge when baking gluten-free sourdough bread is achieving a crust that’s crispy on the outside but soft on the inside. The right baking method ensures you get a perfect crust every time.
How to Bake for the Perfect Crust
- Use Steam: Bake in a Dutch oven or place a pan of hot water in the oven to create steam.
- High Heat First: Start baking at 450°F (232°C) for 15 minutes, then lower to 400°F (204°C).
- Let It Cool: Avoid slicing into your loaf too soon—let it cool completely to set the structure.
Pro Tip: If your crust is too soft, bake uncovered for the last 10 minutes to crisp it up.
How to Fix Common Gluten-Free Sourdough Problems (Troubleshooting Guide)
Even with the right techniques, issues can arise. Here’s how to fix common gluten-free sourdough problems:
1. My Bread Didn’t Rise
- Check if your starter is active—it should double within 6 hours.
- Increase proofing time or place the dough in a slightly warmer spot.
2. My Loaf is Too Dense
- Try increasing hydration slightly for a softer crumb.
- Ensure your starter is mature before baking.
3. My Crust is Too Hard
- Reduce bake time slightly or cover with foil if it browns too quickly.
Now that you know these five game-changing hacks, it’s time to put them into action! With these strategies, your gluten-free sourdough bread will have the perfect rise, texture, and flavor—without the frustration.
How to Store & Keep Gluten-Free Sourdough Bread Fresh
Keeping gluten-free sourdough bread fresh can be tricky since it tends to dry out faster than traditional sourdough. But with the right storage techniques, you can enjoy soft, flavorful bread for days.
Best Ways to Store Gluten-Free Sourdough
- Room Temperature: Store it in a bread bag or wrap it in a clean kitchen towel if you’ll eat it within 24 hours.
- Refrigeration: Not recommended—it speeds up drying. Only refrigerate in humid environments.
- Freezing: Slice the loaf first, then wrap individual slices in plastic wrap and store in a freezer-safe bag for long-term freshness.
Pro Tip: To revive frozen gluten-free sourdough, warm slices in the oven at 350°F (175°C) for 5-7 minutes or toast them for an extra crispy texture.
How to Make Gluten-Free Sourdough More Airy & Light
A common issue with gluten-free sourdough bread is its tendency to be dense. However, with a few key adjustments, you can achieve a light, airy texture.
Techniques to Improve Texture & Lightness
- Increase Hydration: A higher water ratio (85-100%) results in a softer, more open crumb.
- Extended Fermentation: Cold-proofing overnight in the fridge enhances structure and air pockets.
- Use Psyllium Husk: This acts as a binding agent, mimicking gluten’s elasticity.
Pro Tip: For an even airier texture, try replacing some of the water with carbonated water to introduce more bubbles into the dough.
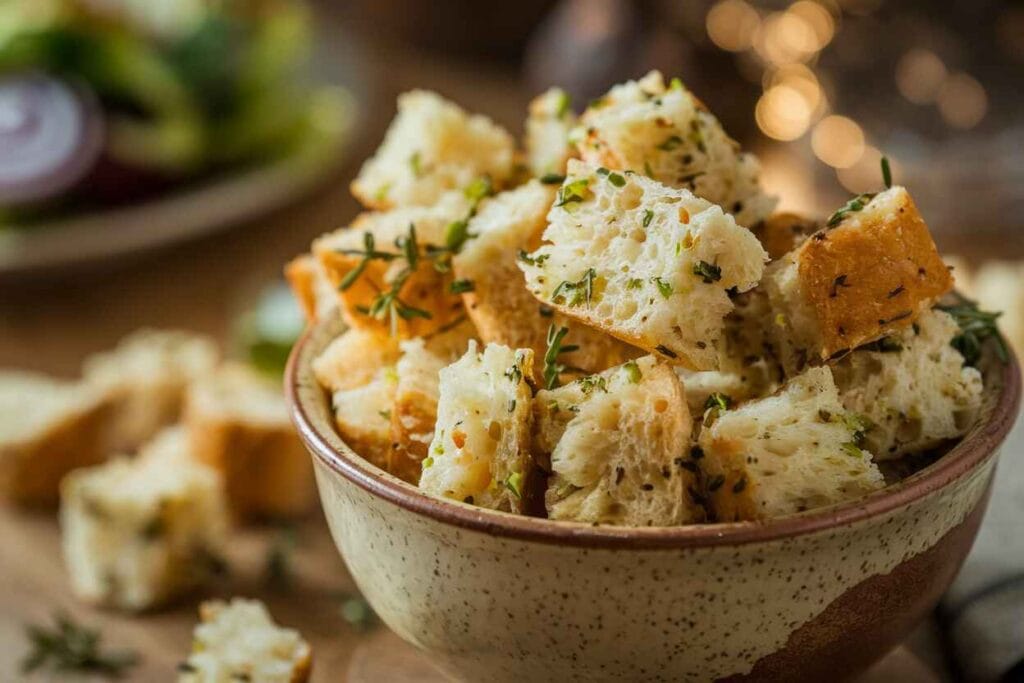
The Best Ways to Use Leftover Gluten-Free Sourdough
If you ever end up with stale or extra gluten-free sourdough bread, don’t throw it out! There are plenty of delicious ways to repurpose it.
Creative Ways to Use Leftover Sourdough
- Gluten-Free Sourdough Croutons: Cube the bread, toss with olive oil and herbs, and bake at 375°F (190°C) until golden and crispy.
- Homemade Bread Crumbs: Blend dried sourdough in a food processor for fresh, gluten-free breadcrumbs.
- French Toast: Stale sourdough is perfect for soaking up egg batter for a rich and flavorful breakfast.
- Sourdough Stuffing: Use cubed, toasted sourdough mixed with broth and herbs for a comforting side dish.
Another great way to use leftover bread is by turning it into a crunchy topping for other dishes. Don’t let leftover gluten-free sourdough go to waste! Instead of discarding stale slices, transform them into a crunchy topping for yogurt parfaits. Simply toast and crumble the bread to add a satisfying crunch to your favorite Parfait Cups. This is a fantastic way to repurpose your bread while enhancing your breakfast or snack with extra texture and flavor. Plus, it’s a great alternative to granola!
Pro Tip: Store leftover gluten-free sourdough in an airtight bag at room temperature for up to three days before using it in recipes.
The Health Benefits of Gluten-Free Sourdough Bread
Beyond its fantastic taste, gluten-free sourdough bread offers some impressive health benefits compared to regular gluten-free loaves.
Why Gluten-Free Sourdough is a Better Choice
- Easier to Digest: The fermentation process breaks down starches and makes nutrients more bioavailable.
- Supports Gut Health: Naturally fermented sourdough contains beneficial bacteria that promote healthy digestion.
- Lower Glycemic Index: It releases glucose more slowly, preventing blood sugar spikes.
Pro Tip: To maximize nutritional benefits, use whole-grain gluten-free flours like brown rice, buckwheat, or sorghum in your sourdough recipe.
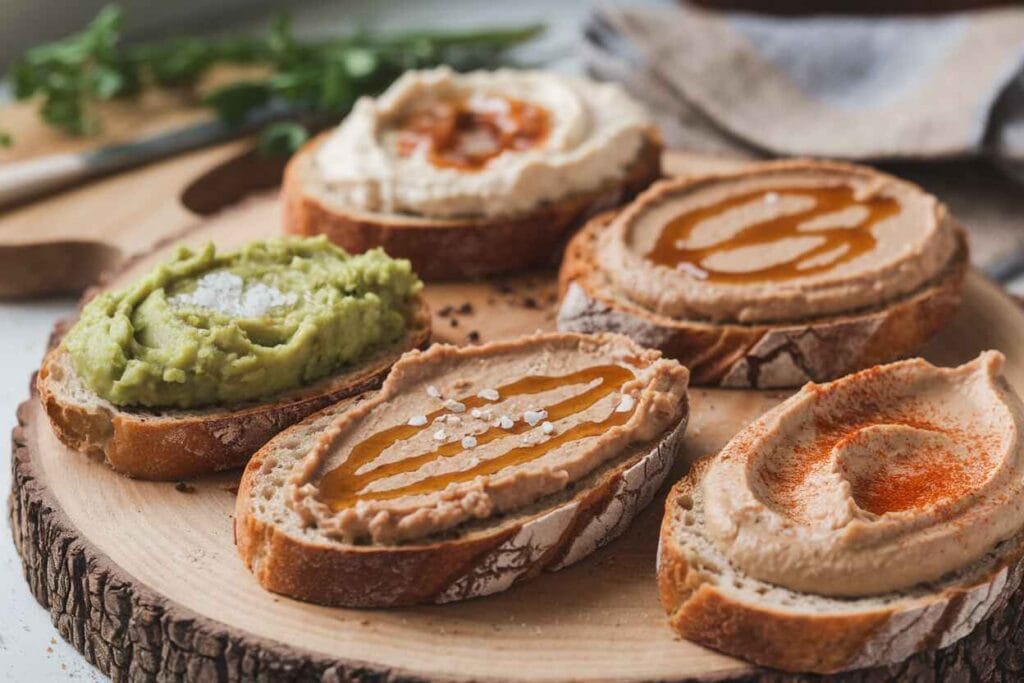
Best Spreads & Toppings for Gluten-Free Sourdough Bread
A great loaf of gluten-free sourdough deserves equally delicious toppings. Whether you prefer sweet or savory, here are some of my favorite ways to enjoy it.
Delicious Toppings for Gluten-Free Sourdough
Savory Options
- Avocado & Sea Salt: Creamy avocado with a pinch of flaky salt is a simple yet satisfying option.
- Hummus & Roasted Veggies: A nutritious, protein-packed option that adds fiber and depth of flavor.
- Soft Goat Cheese & Fig Jam: A gourmet combination that pairs beautifully with sourdough’s tangy flavor.
- Ricotta & Fresh Herbs: A light, creamy spread topped with basil, thyme, or chives for extra freshness.
- Olive Tapenade: A bold, briny topping made from finely chopped olives, capers, and garlic.
- Smoked Salmon & Cream Cheese: A classic pairing that works exceptionally well with toasted sourdough.
If you’re looking for something a little different, here’s a unique topping idea that takes sourdough to the next level. If you’re feeling adventurous with your gluten-free sourdough toppings, why not take inspiration from Japanese cuisine? A unique way to elevate your sourdough experience is by pairing it with Tobiko, a vibrant, crunchy fish roe that adds a burst of umami flavor. Spread a layer of cream cheese on your sourdough toast and sprinkle it with Tobiko for a bold and savory bite. It’s an unexpected but delicious combination for seafood lovers!
Sweet Options
- Nut Butter & Honey: Almond butter with a drizzle of honey offers the perfect sweet-salty balance.
- Strawberry & Mascarpone: A creamy, lightly sweet combination that complements the bread’s natural tang.
- Banana & Cinnamon: Sliced bananas with a sprinkle of cinnamon add natural sweetness.
- Dark Chocolate & Almond Butter: A rich, indulgent topping perfect for dessert-style toast.
- Coconut Butter & Fresh Berries: A dairy-free option with a fresh, fruity touch.
Toasting & Serving Tips
- For a crispy texture: Toast slices on a skillet with a little butter or olive oil.
- For a softer bite: Warm in the oven at 350°F (175°C) for a few minutes instead of toasting.
- For an extra crunch: Sprinkle chopped nuts or seeds on top of your spread.
Sourdough is so versatile that it can be enjoyed with a variety of spreads, but pairing it with the right side dish takes it to another level. Gluten-free sourdough bread pairs perfectly with a light and refreshing side dish, especially during warmer months. If you’re looking for an easy yet delicious pairing, try serving it with this 4 Ingredient Pasta Salad. The balance of fresh ingredients and simple dressing complements the hearty texture of sourdough, making it a fantastic addition to your meal. Whether you’re hosting brunch or just need a quick side, this pasta salad is an effortless way to complete your spread.
Pro Tip: For the crispiest toast, slice your gluten-free sourdough slightly thicker and toast it in a cast-iron skillet with butter.
Bonus Recipe: Gluten-Free Sourdough Dinner Rolls
These soft and fluffy sourdough dinner rolls are the perfect way to enjoy gluten-free sourdough bread in a new form. They’re great as a side dish for any meal!
Ingredients:
- 1 cup active gluten-free sourdough starter
- 2 cups gluten-free flour blend (brown rice, sorghum, tapioca)
- 1 teaspoon salt
- 1 tablespoon olive oil
- ¾ cup warm water
- 1 teaspoon baking soda
Instructions:
- In a mixing bowl, combine the gluten-free sourdough starter, flour, salt, and olive oil.
- Gradually add warm water, stirring until a smooth dough forms.
- Cover and let the dough rise at room temperature for 4-6 hours.
- Preheat the oven to 375°F (190°C). Line a baking tray with parchment paper.
- Shape the dough into small rolls and place them on the tray.
- Brush the tops with olive oil and bake for 20-25 minutes or until golden brown.
- Let cool slightly before serving.
Pro Tip: Brush warm rolls with garlic butter for extra flavor.

Frequently Asked Questions About Gluten-Free Sourdough Bread
Is there a sourdough that is gluten-free?
Yes! Traditional sourdough is made with wheat-based flour, but you can make gluten-free sourdough using a mix of gluten-free flours like rice, sorghum, and buckwheat. The key is using a gluten-free sourdough starter instead of a wheat-based one.
What is the trick to making good gluten-free bread?
The secret to great gluten-free sourdough bread is balancing hydration, fermentation, and flour choice. Using psyllium husk or xanthan gum as a binder improves elasticity, while a long fermentation time enhances flavor and texture.
How do you strengthen a gluten-free sourdough starter?
To build a strong gluten-free sourdough starter, feed it regularly with equal parts flour and water, making sure to use high-nutrient flours like brown rice or sorghum. Keeping it at a consistent warm temperature (75-80°F) will also speed up yeast and bacteria activity.
What makes gluten-free sourdough different from regular sourdough?
Unlike traditional sourdough, which relies on gluten for structure and elasticity, gluten-free sourdough depends on a blend of flours and natural binders like psyllium husk to achieve a similar texture.
How long does gluten-free sourdough bread last?
It stays fresh at room temperature for up to 2 days, but for longer storage, freeze it in slices for up to 3 months.
Why is my gluten-free sourdough bread dense?
Density can result from an inactive starter, low hydration, or insufficient fermentation time. Increasing hydration and allowing a longer fermentation can help create a lighter texture.
Can I use any gluten-free flour to make sourdough?
No. Not all gluten-free flours work well for sourdough. The best options include brown rice flour, sorghum flour, and buckwheat flour combined with starches like tapioca or potato starch.
What’s the best way to store my gluten-free sourdough starter?
Keep it at room temperature and feed it daily. If you don’t plan to bake often, refrigerate the starter and feed it weekly.
Why isn’t my gluten-free sourdough rising?
The most common reason is an underdeveloped starter. Ensure that your starter is mature and bubbly before mixing your dough.
Pro Tip: If your gluten-free sourdough isn’t rising properly, try placing it in a warm environment (75-80°F) to speed up fermentation.
Final Thoughts: Mastering Gluten-Free Sourdough Like a Pro
Baking gluten-free sourdough bread is both a science and an art. Unlike regular sourdough, you have to rethink flour choices, hydration levels, and fermentation techniques. But once you get the hang of it, the results are beyond rewarding.
Key Takeaways for Success
- Be Patient: Mastering gluten-free sourdough takes time. Experiment with different flours and hydration levels until you find the perfect balance.
- Keep Your Starter Healthy: A well-fed and active gluten-free sourdough starter is the foundation of great bread.
- Don’t Skip Fermentation: Long fermentation enhances both texture and flavor—so don’t rush the process.
- Embrace Imperfection: Each loaf teaches you something new, so keep baking and refining your skills.
Now that you have all the knowledge and game-changing hacks, it’s time to get baking. Enjoy the process, experiment with different ingredients, and most importantly—have fun with it!
Pro Tip: If you ever run into trouble, refer back to the Troubleshooting Guide section to quickly fix common gluten-free sourdough problems.